2. Open a terminal and login to the root user account (use the command su).
3. Execute the command:
4. Output will be something like:# lsusb
The second last line is what we are interested in:Bus 007 Device 001: ID 1d6b:0002 Linux Foundation 2.0 root hub
Bus 006 Device 001: ID 1d6b:0002 Linux Foundation 2.0 root hub
Bus 004 Device 001: ID 1d6b:0001 Linux Foundation 1.1 root hub
Bus 002 Device 001: ID 1d6b:0001 Linux Foundation 1.1 root hub
Bus 001 Device 003: ID 1131:1001 Integrated System Solution Corp. KY-BT100 Bluetooth Adapter
Bus 001 Device 001: ID 1d6b:0001 Linux Foundation 1.1 root hub
Bus 005 Device 001: ID 1d6b:0001 Linux Foundation 1.1 root hub
Bus 003 Device 002: ID 05c6:6000 Qualcomm, Inc.
Bus 003 Device 001: ID 1d6b:0001 Linux Foundation 1.1 root hub
The modem manufacturer is Qualcomm Inc. Note the USB device corresponding to it.Bus 003 Device 002: ID 05c6:6000 Qualcomm, Inc
Here, 05c6 (in hexadecimal) is the Vendor ID and 6000 (again n hexadecimal) is the product ID. Note them down.
The command is in the format:# modprobe usbserial vendor=0x05c6 product=0x6000
6. Execute the command:# modprove usbserial vendor=0x<your_vendor_id> product=0x<your_product_id>
If there is a device with name ttyUSB0 then the modem has been recognized. Else, retry the above steps.# cd /dev# ls ttyUSB*
7. To configure the the dialler(the wvdial dialler is used), execute the command:# wvdialconf /etc/wvdial.conf
A file wvdial.conf will be created in the /etc directory. Execute the command to edit it:
For Gnome Users# kwrite /etc/wvdial.conf
Change the file contents to:# gedit /etc/wvdial.conf
For example, if the username and password are 1234567 & 1234, then the file would look like:
Init1 = ATZ
Init2 = ATQ0 V1 E1 S0=0 &C1 &D2 +FCLASS=0
Modem = /dev/ttyUSB0
Phone = #777
Idle Seconds = 7200
Modem Type = Analog Modem
Stupid Mode = 1
Compuserve = 0
Baud = 921600
Auto DNS = 1
Dial Command = ATDT
Ask Password = 0
ISDN = 0
Password =
Username =
8. Execute the command to dial up and connect to the internet:
Init1 = ATZ
Init2 = ATQ0 V1 E1 S0=0 &C1 &D2 +FCLASS=0
Modem = /dev/ttyUSB0
Phone = #777
Idle Seconds = 7200
Modem Type = Analog Modem
Stupid Mode = 1
Compuserve = 0
Baud = 921600
Auto DNS = 1
Dial Command = ATDT
Ask Password = 0
ISDN = 0
Password = 1234567
Username = 1234
DO not close the window as it would close the connection(better minimize it). And when you need to disconnect, press CTRL + C inside the window.# wvdial
In case of problem, just add comment to this blog or mail me with the problem.
Tuesday, March 31, 2009
Sunday, March 29, 2009
Labels: broadband, BSNL, CDMA, computer, EVDO, india, internet, ISP, mobile, reliance, tataindicom
I've been using BSNL EVDO for the last 2 months. It was pretty hard to get my hands on one - as there was a shortage of EVDO USB equipment. The tariffs BSNL proposed were also awesome - Rs.500 for 2.1 Mbps unlimited connection. I had two options - one buy the device or get it for rent. As I had heard that the service provided for the device is pretty bad, I decided to go for renting. So monthly charges became 750 (Rs. 250 as rent).
When I got one in my hands I was pretty impressed - a sleek little devide, slightly larger than a match box. The package also contained a 1 X 2 USB connector (might be for USB 1.0) and a mini CD. Plugging in the device is pretty simple - but XP does not identify the device. I put in the CD and installed the software provided - that's the drivers plus a dialing software for connecting to the network.
The dialler is pretty good - shows the signal strength too. The speeds available will depend on the signal strength you get - as the BSNL CDMA tower is within a couple of KMs from my place that was not an issue. Setting up the connection is also straight forward. The right side of the application has buttons - the second last one being for settings (u'll hv to scroll down for tht).


Saturday, March 28, 2009
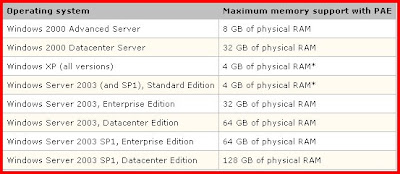
Labels: AMD, crash, Intel, PAE, Physical Address Extension, Quad core, RAM, troubleshoot, Windows, XP
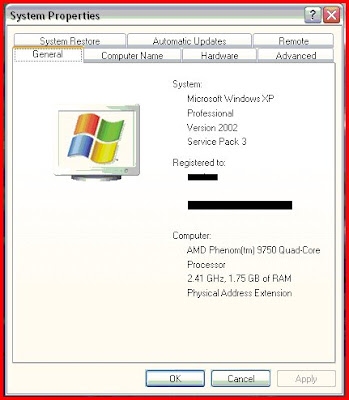
- Locate the Boot.ini file, which is typically in the root folder (for example, C:/) and remove its Read-Only and Hidden attributes.
- Open the Boot.ini file with a text editor, and then add the /PAE parameter to the ARC path, as shown in the following example:
- On the File menu, click Save.
- Restore the Read-Only attribute to the Boot.ini file.
at 11:01 PM Posted by nasweef
0 comments