People who had used windows all their life and are starting to try out various linux distros have always missed some of the windows applications they had used, eventhough better replacements are available for linux. This is a nice demonstration of how u can use wine to run windows application on your linux machine.
Showing posts with label Windows. Show all posts
Showing posts with label Windows. Show all posts
Tuesday, January 4, 2011
Sunday, January 2, 2011
Labels: linux, partitions, ubuntu, Windows, wubi
After ubuntu released wubi for people who were "afraid" to touch their hard disk partitions, but wanted linux, many had tried ubuntu installing it inside windows. Once they are comfortable with ubuntu, they start thinking of moving ubuntu to a seperate partition. But, how can it be done without losing all their information and data in the current ubuntu installation?
That is answered here..
These are the steps required to migrate a wubi 9.10, 10.04 or 10.10 install to partition (grub2 only). The first part shows how to do a manual migration, and the second how to use the attached script to do an automated migration.
The partition(s) must be created already - there are plenty of guides on how to do this.
Manual migration (see below for automated migration)
This example assumes the new install will be on /dev/sda5 and that there will be a swap on /dev/sda6. If there is no swap, just ignore lines containing /dev/sda6. If there is a swap partition it must be of type 'swap'. Change the device names as appropriate.
1. Do this all as root1.a. Ensure you do not have grub-legacy. If the output of the following shows version 0.97 then please do not continue. These instructions only work with grub versions 1.96 and greater.2. Format new partition if not done so already - make sure it's empty, large enough and unmounted
WARNING -- the next command will wipe all existing data on /dev/sda53. Mount new partition and copy files. 4. Setup swap partition and enable hibernation (swap must be at least as big as RAM to hibernate)5. Edit fstab (blank out wubi mounts with sed and add new partitions)6. Remove lupin support and update grub (all in chroot). Note that this step installs the grub bootloader to /dev/sda and will replace your windows bootloader (the line 'grub-install /dev/sda') -- see note below7. Update wubi grub menu to pick up new install and exit sudoYou're done. When you reboot, you should see a grub menu instead of the windows boot menu. Select the first entry. If you didn't run 'grub-install' you can boot from the wubi menu, select your new install from the bottom after the Windows entry.
NOTE on installing the grub bootloader: you can try out the new installation by booting it from the wubi grub menu first - if you want to make sure everything is working before replacing the windows bootloader. To do this, bypass the line 'grub-install /dev/sda' (in step 6.). You can then install the grub2 bootloader manually later after booting into the new install.
I also recommend updating the grub menu after booting into the target partitionAutomated migration
I have attached a parameter driven script that does the above with additional validation e.g. checks the target partition is big enough and empty etc.
Usage instructions:To migrate wubi to /dev/sda5 without swapTo migrate wubi to /dev/sda5 with swap on /dev/sda6If you don't want to install the grub bootloader i.e. you want to leave the windows bootloader in place, use the --no-bootloader option. In this case, you can boot the new install using the wubi menu, and will have to manually install the grub bootloader later.
Warning - while I have tested this numerous times and every attempt has been made to ensure there are no bugs, use it at your own risk.
Please note - it takes some time to copy all the data from wubi to the target partition. e.g. on my computer it takes about 5-10 minutes for a small install (5GB).
Known issues:
1. For some reason, running "update-grub" in the chroot doesn't pick up other linux installations on the same drive (same running the script or manual commands listed above). This is unlikely an issue for wubi users. Run sudo update-grub after booting the new install for the first time.
The partition(s) must be created already - there are plenty of guides on how to do this.
Manual migration (see below for automated migration)
This example assumes the new install will be on /dev/sda5 and that there will be a swap on /dev/sda6. If there is no swap, just ignore lines containing /dev/sda6. If there is a swap partition it must be of type 'swap'. Change the device names as appropriate.
1. Do this all as root
Code:
sudo -iCode:
grub-install --versionWARNING -- the next command will wipe all existing data on /dev/sda5
Code:
mkfs.ext4 /dev/sda5Code:
mkdir /tmp/wubimove
mount /dev/sda5 /tmp/wubimove
rsync -av --exclude=/host --exclude=/mnt/* --exclude=/home/*/.gvfs --exclude=/media/*/* --exclude=/tmp/* --exclude=/proc/* --exclude=/sys/* / /tmp/wubimove
chmod -x /tmp/wubimove/etc/grub.d/10_lupinCode:
mkswap /dev/sda6
echo "RESUME=UUID=$(blkid -o value -s UUID /dev/sda6)" > /tmp/wubimove/etc/initramfs-tools/conf.d/resumeCode:
sed -i 's:/.*[\.]disk .*::' /tmp/wubimove/etc/fstab
echo "UUID=$(blkid -o value -s UUID /dev/sda5)    /    ext4    errors=remount-ro    0    1" >> /tmp/wubimove/etc/fstab
echo "UUID=$(blkid -o value -s UUID /dev/sda6) none swap sw 0 0" >> /tmp/wubimove/etc/fstabCode:
mkdir /tmp/wubimove/host
for i in dev proc sys dev/pts host; do mount --bind /$i /tmp/wubimove/$i; done
chroot /tmp/wubimove
dpkg-divert --local --rename --add /sbin/initctl
ln -s /bin/true /sbin/initctl
apt-get -y remove lupin-support
update-grub
grub-install /dev/sda
rm /sbin/initctl
dpkg-divert --local --rename --remove /sbin/initctl
exit
for i in host dev/pts dev proc sys; do umount /tmp/wubimove/$i; done
rmdir /tmp/wubimove/host
umount /dev/sda5Code:
update-grub
exitNOTE on installing the grub bootloader: you can try out the new installation by booting it from the wubi grub menu first - if you want to make sure everything is working before replacing the windows bootloader. To do this, bypass the line 'grub-install /dev/sda' (in step 6.). You can then install the grub2 bootloader manually later after booting into the new install.
I also recommend updating the grub menu after booting into the target partition
Code:
sudo update-grubI have attached a parameter driven script that does the above with additional validation e.g. checks the target partition is big enough and empty etc.
Usage instructions:
Code:
bash wubi-move.sh --helpCode:
sudo bash wubi-move.sh /dev/sda5Code:
sudo bash wubi-move.sh /dev/sda5 /dev/sda6Code:
sudo bash wubi-move.sh --no-bootloader /dev/sda5 /dev/sda6Warning - while I have tested this numerous times and every attempt has been made to ensure there are no bugs, use it at your own risk.
Please note - it takes some time to copy all the data from wubi to the target partition. e.g. on my computer it takes about 5-10 minutes for a small install (5GB).
Known issues:
1. For some reason, running "update-grub" in the chroot doesn't pick up other linux installations on the same drive (same running the script or manual commands listed above). This is unlikely an issue for wubi users. Run sudo update-grub after booting the new install for the first time.
Saturday, March 28, 2009
Labels: AMD, crash, Intel, PAE, Physical Address Extension, Quad core, RAM, troubleshoot, Windows, XP
After a resent system crash, I had to re-install winXP (Iam still on XP - vista be damned!). And after that my system was rebooting at random - within 5 minutes of startup. I removed one of the two 2GB RAM modules and rebooted. Hollaa!!! everything ok.
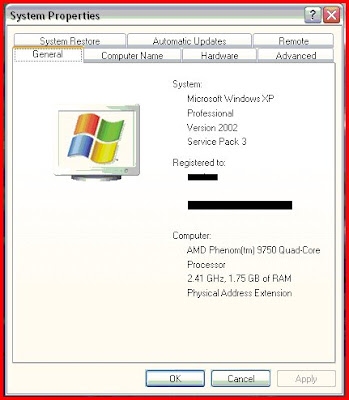
I rechecked the system configurations and found "Physical Address Extension" on system properties. I had heard about PAE before - its something to remap the memory addresses for 32-bit systems - for them, the total addressable memory is 4GB. Some part of the addressable space would be used for other hardwares. So on using 4GB RAM, only around 3GB would be available. To access the rest, PAE should be enabled (with supporting hardware).
This is what MS says about PAE:
PAE is an Intel-provided memory address extension that enables support of greater than 4 GB of physical memory for most 32-bit (IA-32) Intel Pentium Pro and later platforms.
The PAE kernel is not enabled by default for systems that can support more than 4 GB of RAM.To boot the system and utilize PAE memory, the /PAE switch must be added to the corresponding entry in the Boot.ini file. If a problem should arise, Safe Mode may be used, which causes the system to boot using the normal kernel (support for only 4 GB of RAM) even if the /PAE switch is part of the Boot.ini file.
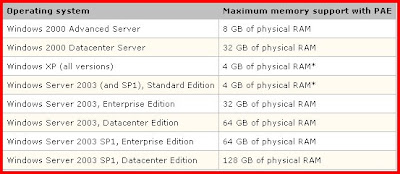
The PAE mode kernel requires an Intel Architecture processor, Pentium Pro or later, more than 4 GB of RAM, and Windows 2000, Windows XP, or Windows Server 2003.
The PAE kernel can be enabled automatically without the /PAE switch present in the boot entry if the system has DEP enabled (/NOEXECUTE switch is present) or the system processor supports hardware-enforced DEP. Presence of the /NOEXECUTEswitch on a system with a processor that supports hardware-enforced DEP implies the /PAE switch. If the system processor is capable of hardware-enforced DEP and the /NOEXECUTE switch is not present in the boot entry, Windows assumes/NOEXECUTE=optin by default and enables PAE mode.
Now I had to find out how PAE is enabled and disabled in XP - and that too was there on the same page . This is what it said:
Enabling PAE
Locate the Boot.ini file, which is typically in the root folder (for example, C:/) and remove its Read-Only and Hidden attributes.
- Locate the Boot.ini file, which is typically in the root folder (for example, C:/) and remove its Read-Only and Hidden attributes.
- Open the Boot.ini file with a text editor, and then add the /PAE parameter to the ARC path, as shown in the following example:
multi(0)disk(0)rdisk(0)partition(2) \WINNT="Windows ???? Datacenter Server" /PAE /basevideo /sos
- On the File menu, click Save.
- Restore the Read-Only attribute to the Boot.ini file.
Disabling PAE
Disable PAE by removing the /PAE parameter in the Boot.ini file. If you must disable PAE but your system processor supports hardware-enforced DEP, add /NOPAE /NOEXECUTE=alwaysoff to your Boot.ini file. Note: This will disable the DEP feature on your computer.
I changed boot.ini and rebooted the system with the whole 4GB RAM - and now everything works damn good!
Subscribe to:
Posts (Atom)
at 9:45 PM Posted by nasweef
0 comments